LLM 추론 최적화 Part 4 — 프로덕션 서빙
vLLM과 TGI로 프로덕션 배포. Continuous Batching, Speculative Decoding, 메모리 버짓 설계, 처리량 벤치마크.
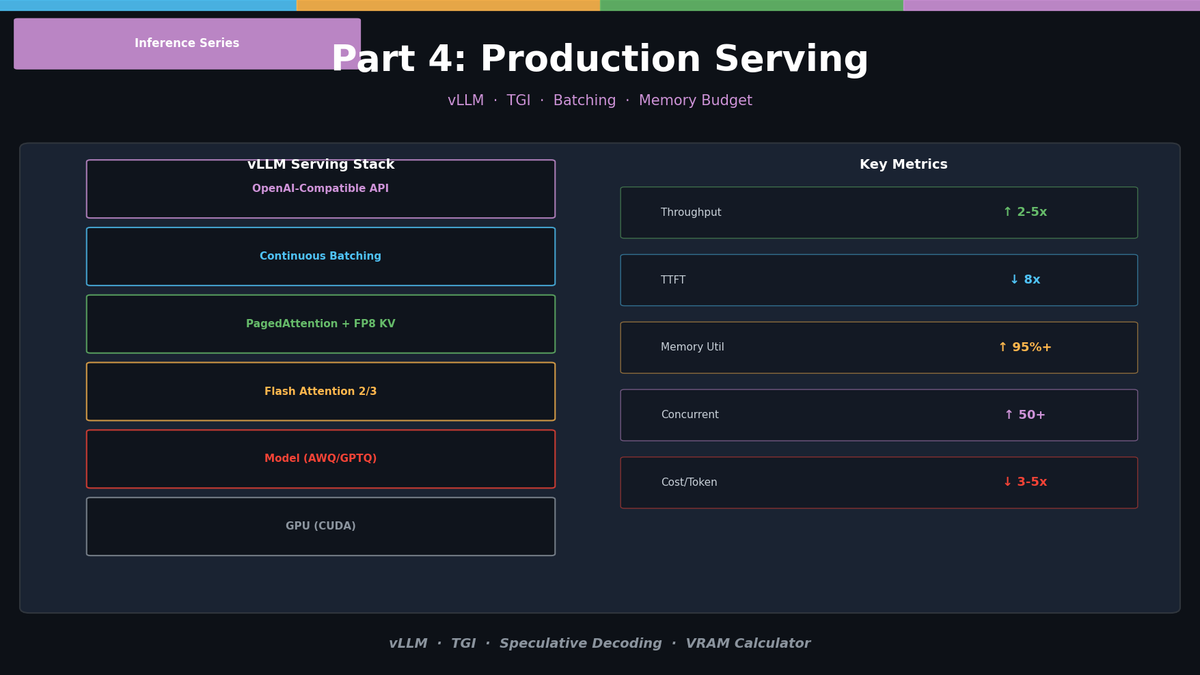
LLM 추론 최적화 Part 4 — 프로덕션 서빙
시리즈의 마지막 Part입니다. Part 1~3에서 다룬 Attention 최적화, KV Cache 관리, Sparse Attention을 실제 프로덕션 환경에서 어떻게 조합하는지 다룹니다.
핵심 도구는 vLLM과 TGI (Text Generation Inference) 입니다. 이 두 엔진이 위에서 배운 최적화들을 어떻게 통합하는지, 실전 설정은 어떻게 하는지를 코드와 함께 살펴봅니다.
vLLM vs TGI — 한눈에 비교
| 특성 | vLLM | TGI (HuggingFace) |
|---|---|---|
| PagedAttention | 기본 지원 | 기본 지원 |
| Continuous Batching | 지원 | 지원 |
| Flash Attention | 지원 | 지원 |
| KV Cache 양자화 | FP8 지원 | 부분 지원 |
| 모델 양자화 | AWQ, GPTQ, Marlin | AWQ, GPTQ, EETQ |
| Speculative Decoding | 지원 | 지원 |
| Multi-GPU (Tensor Parallel) | 지원 | 지원 |
| API 호환성 | OpenAI 호환 | 자체 + OpenAI 호환 |
| 설치 난이도 | pip install | Docker 기반 |
vLLM 실전 배포
기본 설정
from vllm import LLM, SamplingParams

llm = LLM(
    model="meta-llama/Llama-3.1-8B-Instruct",
    dtype="float16",

    # === 메모리 관리 ===
    gpu_memory_utilization=0.90,   # GPU 메모리의 90% 사용
    max_model_len=32768,            # 최대 컨텍스트 길이

    # === KV Cache 최적화 ===
    kv_cache_dtype="auto",          # "auto", "fp8_e5m2", "fp8_e4m3"
    # kv_cache_dtype="fp8_e5m2",    # FP8 KV Cache → 메모리 2x 절감

    # === 양자화 ===
    # quantization="awq",           # 모델 가중치 양자화

    # === 병렬화 ===
    tensor_parallel_size=1,         # GPU 수
)

params = SamplingParams(
    temperature=0.7,
    top_p=0.9,
    max_tokens=1024,
    stop=["<|eot_id|>"],
)

output = llm.generate("Explain quantum computing.", params)
print(output[0].outputs[0].text)
OpenAI 호환 API 서버
# vLLM 서버 시작
python -m vllm.entrypoints.openai.api_server \
    --model meta-llama/Llama-3.1-8B-Instruct \
    --dtype float16 \
    --gpu-memory-utilization 0.9 \
    --max-model-len 32768 \
    --kv-cache-dtype fp8_e5m2 \
--port 8000# 클라이언트에서 사용 (OpenAI SDK 호환)
from openai import OpenAI
client = OpenAI(base_url="http://localhost:8000/v1", api_key="dummy")
response = client.chat.completions.create(
model="meta-llama/Llama-3.1-8B-Instruct",
messages=[
{"role": "system", "content": "You are a helpful assistant."},
{"role": "user", "content": "Explain quantum computing."},
],
temperature=0.7,
max_tokens=1024,
)
print(response.choices[0].message.content)Continuous Batching — 처리량 극대화
기존 Static Batching의 문제
[Static Batching]
Request A: "Hello" → 50 tokens (빨리 끝남)
Request B: "Write an essay..." → 500 tokens (느림)
Request C: "Hi" → 30 tokens (빨리 끝남)

→ 배치가 모두 끝날 때까지 기다려야 함
→ A, C는 B를 기다리며 GPU 놀림
→ Total time: ~B의 시간 (비효율)
Continuous Batching
[Continuous Batching]
Step 1: A, B, C 동시 처리
Step 30: C 완료 → 즉시 새 Request D 투입
Step 50: A 완료 → 즉시 새 Request E 투입
Step 500: B 완료

→ GPU가 항상 최대 부하로 동작
→ Throughput 2~5x 향상# vLLM은 기본적으로 Continuous Batching 사용
# 별도 설정 없이 여러 요청을 동시에 보내면 자동 배치
import asyncio
from openai import AsyncOpenAI
client = AsyncOpenAI(base_url="http://localhost:8000/v1", api_key="dummy")
async def send_request(prompt: str):
response = await client.chat.completions.create(
model="meta-llama/Llama-3.1-8B-Instruct",
messages=[{"role": "user", "content": prompt}],
max_tokens=256,
)
return response.choices[0].message.content
async def benchmark_continuous_batching():
"""동시 요청으로 Continuous Batching 테스트"""
prompts = [
"What is Python?",
"Write a haiku about AI.",
"Explain gravity in one sentence.",
"List 5 programming languages.",
"What is the speed of light?",
"Describe photosynthesis briefly.",
"What is machine learning?",
"Name 3 planets.",
]
import time
start = time.perf_counter()
# 모든 요청을 동시에 전송
results = await asyncio.gather(*[send_request(p) for p in prompts])
elapsed = time.perf_counter() - start
print(f"Total time for {len(prompts)} requests: {elapsed:.1f}s")
print(f"Average per request: {elapsed/len(prompts):.1f}s")
print(f"Throughput: {len(prompts)/elapsed:.1f} req/s")
asyncio.run(benchmark_continuous_batching())Speculative Decoding — Decode 속도 향상
원리
작은 모델(Draft Model)이 빠르게 여러 토큰을 "추측"하고, 큰 모델(Target Model)이 한 번에 검증합니다.
[기존 Decode]
Step 1: Large model → token 1
Step 2: Large model → token 2
Step 3: Large model → token 3
→ 3번의 Large model forward pass

[Speculative Decoding]
Step 1: Small model → [token 1, token 2, token 3] (빠름)
Step 2: Large model → 3개 토큰 한 번에 검증
→ 1번의 Large model forward pass로 ~3 토큰 생성# vLLM에서 Speculative Decoding 설정
python -m vllm.entrypoints.openai.api_server \
--model meta-llama/Llama-3.1-8B-Instruct \
--speculative-model meta-llama/Llama-3.2-1B-Instruct \
--num-speculative-tokens 5 \
--dtype float16 \
--port 8000Speculative Decoding의 효과
| 태스크 | 속도 향상 | 수용률 |
|---|---|---|
| 코드 생성 | 1.5~2.5x | 70~85% |
| 자연어 텍스트 | 1.3~2.0x | 60~75% |
| 수학/추론 | 1.1~1.5x | 40~60% |
수용률(Acceptance Rate)이 높을수록 효과가 큽니다. 코드처럼 예측 가능한 패턴이 많은 태스크에서 효과가 큽니다.
메모리 버짓 설계
실전 VRAM 계산기
def design_memory_budget(
    model_name: str,
    model_params_b: float,
    num_layers: int,
    kv_heads: int,
    head_dim: int,
    gpu_vram_gb: float,
    model_quant: str = "fp16",       # "fp16", "int8", "int4"
    kv_quant: str = "fp16",          # "fp16", "fp8", "int8"
    target_context: int = 8192,
):
    """실전 VRAM 버짓 설계"""

    quant_bytes = {"fp16": 2, "fp8": 1, "int8": 1, "int4": 0.5}
    model_bytes = quant_bytes[model_quant]
    kv_bytes = quant_bytes[kv_quant]

    # 1. 모델 가중치
    model_gb = model_params_b * 1e9 * model_bytes / 1024**3

    # 2. CUDA Context + Overhead (~1.5 GB)
    overhead_gb = 1.5

    # 3. 사용 가능한 KV Cache 공간
    available_gb = gpu_vram_gb - model_gb - overhead_gb

    # 4. 토큰당 KV Cache 크기
    kv_per_token = 2 * num_layers * kv_heads * head_dim * kv_bytes

    # 5. 최대 동시 토큰 수 (모든 배치의 합)
    max_total_tokens = int(available_gb * 1024**3 / kv_per_token)

    # 6. 목표 컨텍스트에서 최대 동시 요청 수
    max_concurrent = max_total_tokens // target_context

    print(f"=== {model_name} on {gpu_vram_gb}GB GPU ===")
    print(f"Model ({model_quant}): {model_gb:.1f} GB")
    print(f"Overhead: {overhead_gb:.1f} GB")
    print(f"Available for KV: {available_gb:.1f} GB")
    print(f"KV per token ({kv_quant}): {kv_per_token} bytes")
    print(f"Max total tokens: {max_total_tokens:,}")
    print(f"@ {target_context} context → Max concurrent: {max_concurrent}")
    print()

    return {
        'model_gb': model_gb,
        'available_kv_gb': available_gb,
        'max_total_tokens': max_total_tokens,
        'max_concurrent': max_concurrent,
    }

# === 시나리오별 설계 ===

# 시나리오 1: RTX 4090 (24GB) — 개인 서버
print("=== Scenario 1: Personal Server (RTX 4090 24GB) ===\n")
design_memory_budget("Llama 3.1 8B", 8, 32, 8, 128, 24,
                     model_quant="int4", kv_quant="fp16", target_context=8192)

# 시나리오 2: A100 (80GB) — 프로덕션
print("=== Scenario 2: Production (A100 80GB) ===\n")
design_memory_budget("Llama 3.1 8B", 8, 32, 8, 128, 80,
                     model_quant="fp16", kv_quant="fp8", target_context=16384)

# 시나리오 3: A100 (80GB) — 긴 컨텍스트 에이전트
print("=== Scenario 3: Long Context Agent (A100 80GB) ===\n")
design_memory_budget("Llama 3.1 8B", 8, 32, 8, 128, 80,
                     model_quant="int4", kv_quant="fp8", target_context=65536)

# 시나리오 4: H100 (80GB) — 70B 모델
print("=== Scenario 4: Large Model (H100 80GB) ===\n")
design_memory_budget("Llama 3.1 70B", 70, 80, 8, 128, 80,
model_quant="int4", kv_quant="fp8", target_context=8192)TGI 실전 배포
Docker 기반 배포
# TGI 서버 시작 (Docker)
docker run --gpus all -p 8080:80 \
    -v $HOME/.cache/huggingface:/data \
    ghcr.io/huggingface/text-generation-inference:latest \
    --model-id meta-llama/Llama-3.1-8B-Instruct \
    --dtype float16 \
    --max-input-tokens 4096 \
    --max-total-tokens 8192 \
    --max-batch-prefill-tokens 16384 \
--max-concurrent-requests 64# TGI 클라이언트
from huggingface_hub import InferenceClient
client = InferenceClient("http://localhost:8080")
response = client.chat_completion(
messages=[
{"role": "system", "content": "You are a helpful assistant."},
{"role": "user", "content": "Explain the KV cache."},
],
max_tokens=512,
temperature=0.7,
)
print(response.choices[0].message.content)성능 벤치마크
처리량(Throughput) 측정
import time
import asyncio
from openai import AsyncOpenAI

async def benchmark_throughput(
    base_url: str,
    model: str,
    num_requests: int = 100,
    max_concurrent: int = 16,
    input_tokens: int = 128,
    output_tokens: int = 256,
):
    """서빙 엔진 처리량 벤치마크"""
    client = AsyncOpenAI(base_url=base_url, api_key="dummy")

    # 고정 길이 프롬프트 생성
    prompt = "Write a detailed explanation about: " + "token " * input_tokens

    semaphore = asyncio.Semaphore(max_concurrent)
    results = []

    async def single_request():
        async with semaphore:
            start = time.perf_counter()
            try:
                response = await client.chat.completions.create(
                    model=model,
                    messages=[{"role": "user", "content": prompt}],
                    max_tokens=output_tokens,
                    temperature=0.7,
                )
                elapsed = time.perf_counter() - start
                tokens = response.usage.completion_tokens
                return {"elapsed": elapsed, "tokens": tokens, "success": True}
            except Exception as e:
                return {"elapsed": 0, "tokens": 0, "success": False, "error": str(e)}

    start_total = time.perf_counter()
    results = await asyncio.gather(*[single_request() for _ in range(num_requests)])
    total_time = time.perf_counter() - start_total

    successful = [r for r in results if r["success"]]
    total_tokens = sum(r["tokens"] for r in successful)

    print(f"=== Throughput Benchmark ===")
    print(f"Requests: {len(successful)}/{num_requests} successful")
    print(f"Total time: {total_time:.1f}s")
    print(f"Throughput: {len(successful)/total_time:.1f} req/s")
    print(f"Token throughput: {total_tokens/total_time:.0f} tok/s")
    print(f"Avg latency: {sum(r['elapsed'] for r in successful)/len(successful)*1000:.0f} ms")
    print(f"P50 latency: {sorted(r['elapsed'] for r in successful)[len(successful)//2]*1000:.0f} ms")
    print(f"P99 latency: {sorted(r['elapsed'] for r in successful)[int(len(successful)*0.99)]*1000:.0f} ms")

# 벤치마크 실행
asyncio.run(benchmark_throughput(
    base_url="http://localhost:8000/v1",
    model="meta-llama/Llama-3.1-8B-Instruct",
    num_requests=100,
    max_concurrent=16,
))
프로덕션 체크리스트
실제 배포 전에 확인해야 할 항목을 정리합니다.
메모리
- [ ] 모델 + KV Cache + 오버헤드가 GPU VRAM에 들어가는지 확인
- [ ]
gpu_memory_utilization을 90~95%로 설정 (OOM 방지 여유) - [ ] 최대 컨텍스트 × 최대 동시 요청 수에 필요한 KV Cache 공간 계산
- [ ] KV Cache 양자화(FP8) 적용 시 품질 테스트 완료
속도
- [ ] Flash Attention 2/3 활성화 확인
- [ ] Continuous Batching 활성화 확인
- [ ] Speculative Decoding 평가 (수용률 60%+ 인지)
- [ ] Prefill과 Decode 레이턴시를 분리해서 측정
안정성
- [ ] OOM 발생 시 graceful degradation 설정 (요청 거부 vs 큐잉)
- [ ] Health check 엔드포인트 설정
- [ ] 요청 타임아웃 설정
- [ ] GPU 메모리 모니터링 알림
비용
- [ ] 토큰당 비용 = GPU 시간 비용 / 처리 토큰 수
- [ ] 양자화로 작은 GPU에서 돌릴 수 있는지 검토
- [ ] 배치 크기 최적화로 처리량 극대화
이 글에서 다룬 양자화와 서빙을 GPTQ, AWQ, GGUF, QLoRA까지 코드로 직접 다뤄보고 싶다면 LLM Quantization and Compression Hands-On 강의에 24강 분량으로 정리해뒀습니다. 3강까지는 무료입니다.
시리즈 정리
| Part | 주제 | 핵심 |
|---|---|---|
| 1 | Attention 해부 | MHA/GQA/MQA, KV Cache 원리, Prefill vs Decode |
| 2 | KV Cache 최적화 | 양자화, PCA 압축, PagedAttention |
| 3 | Sparse Attention | Sliding Window, DSA, IndexCache, DMS |
| 4 | 프로덕션 서빙 | vLLM/TGI, 배치 전략, 메모리 버짓 |
최종 추천 스택
[개인/소규모]
모델: Qwen 2.5 7B (GQA-4, 적은 KV Cache)
양자화: GPTQ int4
서빙: vLLM + Flash Attention 2
KV: fp16 (7B 모델은 KV가 작아서 양자화 불필요)

[프로덕션]
모델: Llama 3.1 8B 또는 70B
양자화: AWQ int4 (8B) 또는 fp16 Multi-GPU (70B)
서빙: vLLM + Continuous Batching + FP8 KV Cache
추가: Speculative Decoding (코드 생성 등)

[긴 컨텍스트 에이전트]
모델: DeepSeek-V3.2 (DSA 내장) 또는 Llama 3.1 + DMS
양자화: AWQ int4
서빙: vLLM + FP8 KV Cache
추가: IndexCache (DSA 모델), 또는 KVTC 스타일 압축주간 뉴스레터에 새 글 링크를 담아 보냅니다. 메일은 영어로 발송됩니다.
이 글과 이어지는 강좌
SOTAAZ 강좌
강좌는 하나씩 살 수 있습니다. 13개 전체가 필요하면 $199 평생 번들도 있습니다.
이메일로 받아보기
관련 포스트
KV 캐시 줄이는 12가지, A100 한 장에서 실측 — 1편: 12개를 한 줄로 세울 수 없습니다
KV 캐시 기법 목록은 12개를 나란히 놓지만 각각이 얼마인지는 말하지 않습니다. A100 한 장에서 재보니 프리픽스 재사용은 공유 프리픽스 작업을 59.4초에서 6.2초로 줄였고, paged 블록 크기는 용량을 1%도 바꾸지 못했습니다. 둘을 한 줄로 세울 수 없는 이유는 지불 단위가 다르기 때문입니다.
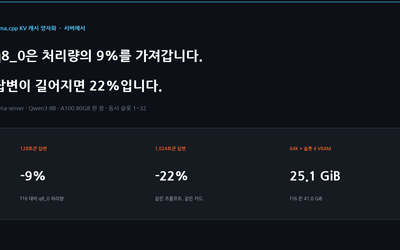
llama.cpp KV 캐시 양자화: q8_0 처리량 손실이 9%에서 22%로 커지는 이유
본류 llama.cpp, A100 한 장, Qwen3-8B Q4_K_M, llama-server 동시 슬롯 1~32. 32K 프롬프트에서 q8_0은 요청당 128토큰을 생성할 때 서버 처리량의 9%를 잃었고, 1,024토큰을 생성할 때는 22%를 잃었습니다. 짧은 쪽은 프리필이 벽시계를 지배하는데 프리필은 KV 타입을 타지 않기 때문입니다. 토큰당 디코드는 34% 느렸고 이는 llama-bench 결과와 일치합니다. 시작 직후 VRAM 사용량은 64K 슬롯 4개에서 41.0 GiB에서 25.1 GiB로 내려갔습니다.
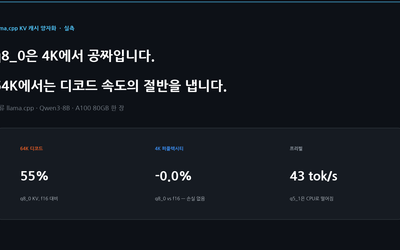
llama.cpp KV 캐시 양자화, A100 한 장에서 실측 — q8_0은 4K에서 공짜이고 64K에서는 디코드 속도 절반을 냅니다
본류 llama.cpp, Qwen3-8B, A100 한 장. -ctk q8_0 -ctv q8_0은 퍼플렉시티가 f16과 같고 32K 캐시를 2.11 GiB 줄이지만, 64K 깊이 디코드는 f16의 55%로 떨어집니다(q4_0은 50%). q5_1과 K q8_0/V q4_0 혼합은 프리필이 초당 43·63토큰으로 조용히 CPU에서 돌았습니다.